Step-by-Step tEarn Install on Google's Blogger
If you don't already have a blog then
go to http://www.blogger.com to create your new blog.
Follow the 3 easy steps to create a blog
Create a tEarn Account
Go to http://ady.tearn.com
Select "Sign In" upper right corner
If you already have an account sign in and select "Log In" button.
Skip to the "Setup your Publisher Profile page" slide
If you do not already have an account press the "Sign Up" link.
Select a user name and fill in the blanks.
After you have filled in the information select the "Done" button
Press the "Continue" button
Optionally fill your profile information and
the press "Update Profile" button
Setting up your Publisher Profile
Select the "Publisher" link on the left most navigation tree
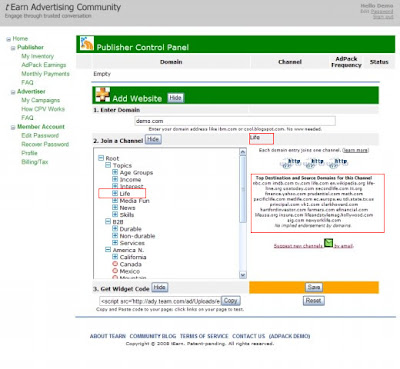
The Publishers control is displayed
Select the "Show" button to open up the "Add Website" dialog
Enter thew domain of your web site
Select "Show" under "Join a Channel" to open up the Channel selection dialog.
in the example we selected "Life"
 Select the "Get Widget Code" "Show" button to display the tEarn code snippet that you will include on your blog.
Select the "Copy" button to copy the code snippet to the clipboard.
 Pasting the code snippet in to your blog
Login to Blogger
Select "Layout" tab
Select the "Edit HTML" tab
Scroll down to the bottom just before "/body "the tag and paste the tEarn code snippet
Select "SAVE TEMPLATE"
Your blog is ready to display tEarn Ads!!
All external links will display Ads


